It’s easy and interesting to develop a desktop application using Swing toolkit.
This post will not tell on how to use swing toolkit. But it is to show how to develop a simple application in eclipse and then generate a runnable application jar.
By the end of this post you will have a runnable desktop application.
Follow the steps given below.
Step 1: Open the eclipse.
Step 2: Create an Application client project in eclipse.
Right click on Project explorer ->select new ->select Project -> Select Application Client Project in the select wizard->Click on next
-> Enter project Name (i.e SampleDesktopApps) -> Click on next -> Click on next -> Click on Finish.

Project will create a default Main class in the project.
Project created will have MANIFEST.MF file with the following details.
Manifest-Version: 1.0
Main-Class: Main
Manifest-Version indicates version number of the manifest standard.
Main-Class indicates the class file where the execution has to begin.
Since we have created the project with default main class, it refers to Main class in the default package.
Step 3: Rename the Main class to StartupClass and update the Main-Class to StartupClass in MANIFEST.MF. (To avoid confusion)
MANIFEST.MF
Manifest-Version: 1.0
Main-Class: StartupClass
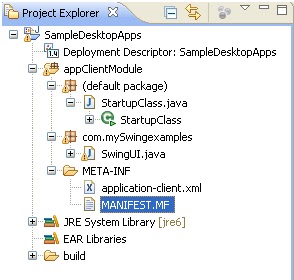
Package structure:
Step 4: Create the classes to write the swing code for user interface.
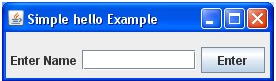
I will write a simple hello word program in SwingUI class.
SwingUI.java
package com.mySwingexamples;
import java.awt.BorderLayout;
import java.awt.event.ActionEvent;
import java.awt.event.ActionListener;
import javax.swing.JButton;
import javax.swing.JFrame;
import javax.swing.JLabel;
import javax.swing.JOptionPane;
import javax.swing.JPanel;
import javax.swing.JTextField;
public class SwingUI extends JPanel
{
public void run() {
final JFrame f = new JFrame("Simple hello Example");
final JTextField fName = new JTextField();
JButton submit = new JButton("Enter");
JLabel lab = new JLabel("Enter Name", JLabel.RIGHT);
fName.setColumns(10);
lab.setLabelFor(fName);
submit.addActionListener(new ActionListener() {
public void actionPerformed(ActionEvent e) {
fName.getText();
JOptionPane.showMessageDialog(f, "Hello "+ fName.getText());
}
});
JPanel form = new JPanel();
f.setDefaultCloseOperation(JFrame.EXIT_ON_CLOSE);
f.getContentPane().add(form, BorderLayout.NORTH);
JPanel p = new JPanel();
p.add(lab);
p.add(fName);
p.add(submit);
f.getContentPane().add(p, BorderLayout.SOUTH);
f.pack();
f.setVisible(true);
}
}
Step 5: Edit the StartupClass class to call the UI.
StartupClass.java
import com.mySwingexamples.SwingUI;
public class StartupClass {
public static void main(String[] args) {
SwingUI StartSwingApplication = new SwingUI();
StartSwingApplication.run();
}
public StartupClass() {
super();
}
}
Step 6: Create the Runnable Jar file by selecting the entire project.
Right click on project (i.e SampleDesktopApps) -> Click on Export ->Select Runnable Jar file-> click on next


In the next window,
Select the LaunchConfiguration from the dropdown as the class having Main method (StartupClass in the above example).
Click on browse and select the directory where jar file should be saved and enter a name for Jar file and click on finish button.


(Click on Ok if there are any warning messages appearing while creating the Jar file)

Runnable Jar file gets created in the directory mentioned.
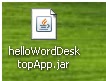
Step 7: This Jar can be used as independent application. Double click on the created Jar to use the application.


Thanks.. a lot
ReplyDeleteI dont get an option of Application Client Project, I am using v21.0.0-531062
ReplyDeleteHi please tell me the tool that you are using
DeleteY its created but windows give me error....its not running..
ReplyDeletePlease help me.
looks nice..
ReplyDeletesuper...
ReplyDeletejar file not running please help
ReplyDeleteJust make sure that you are using JDK 7.
ReplyDeleteIt will work
Which to tool should use to convert Jar to .exe file?
ReplyDeleteWhich tool should use to convert Jar to .exe file?
ReplyDeleteThis is a very good tip especially to those fresh to the blogosphere.
ReplyDeleteSimple but very precise info… Thanks for sharing this one.
Desktop Application Development USA
Thanks for sharing such great article. It has lot of useful information about Desktop Application Development
ReplyDeleteKeep sharing...
Thank You :)
I would like to thank you for the efforts you have made in writing this desktop application development article. I am hoping the same best work from you in the future as well..
ReplyDeleteGreat piece of information. Very informative. This is truly a great read for me. I have bookmarked it and I am looking forward to reading new articles. Keep up the good work!
ReplyDeleteDesktop Application Development
Quick Android App Development