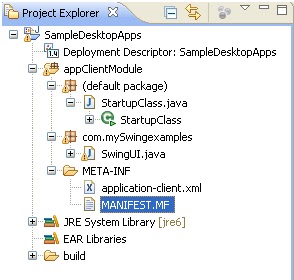
It’s easy and interesting to develop a desktop application using Swing toolkit.
This post will not tell on how to use swing toolkit. But it is to show how to develop a simple application in eclipse and then generate a runnable application jar.
By the end of this post you will have a runnable desktop application.
Follow the steps given below.
Step 1: Open the eclipse.
Step 2: Create an Application client project in eclipse.
Right click on Project explorer ->select new ->select Project -> Select Application Client Project in the select wizard->Click on next
Project will create a default Main class in the project.
Project created will have MANIFEST.MF file with the following details.
Manifest-Version: 1.0
Main-Class: Main
Manifest-Version indicates version number of the manifest standard.
Main-Class indicates the class file where the execution has to begin.
Since we have created the project with default main class, it refers to Main class in the default package.
Step 3: Rename the Main class to StartupClass and update the Main-Class to StartupClass in MANIFEST.MF. (To avoid confusion)
MANIFEST.MF
Manifest-Version: 1.0
Step 4: Create the classes to write the swing code for user interface.
I will write a simple hello word program in SwingUI class.
SwingUI.java
package com.mySwingexamples;
import java.awt.BorderLayout;
import java.awt.event.ActionEvent;
import java.awt.event.ActionListener;
import javax.swing.JButton;
import javax.swing.JFrame;
import javax.swing.JLabel;
import javax.swing.JOptionPane;
import javax.swing.JPanel;
import javax.swing.JTextField;
public class SwingUI extends JPanel
{
public void run() {
final JFrame f = new JFrame("Simple hello Example");
final JTextField fName = new JTextField();
JButton submit = new JButton("Enter");
JLabel lab = new JLabel("Enter Name", JLabel.RIGHT);
fName.setColumns(10);
lab.setLabelFor(fName);
submit.addActionListener(new ActionListener() {
public void actionPerformed(ActionEvent e) {
fName.getText();
JOptionPane.showMessageDialog(f, "Hello "+ fName.getText());
}
});
JPanel form = new JPanel();
f.setDefaultCloseOperation(JFrame.EXIT_ON_CLOSE);
f.getContentPane().add(form, BorderLayout.NORTH);
JPanel p = new JPanel();
p.add(lab);
p.add(fName);
p.add(submit);
f.getContentPane().add(p, BorderLayout.SOUTH);
f.pack();
f.setVisible(true);
}
}
Step 5: Edit the StartupClass class to call the UI.
StartupClass.java
import com.mySwingexamples.SwingUI;
public class StartupClass {
public static void main(String[] args) {
SwingUI StartSwingApplication = new SwingUI();
StartSwingApplication.run();
}
public StartupClass() {
super();
}
}
Step 6: Create the Runnable Jar file by selecting the entire project.
Right click on project (i.e SampleDesktopApps) -> Click on Export ->Select Runnable Jar file-> click on next
In the next window,
Select the LaunchConfiguration from the dropdown as the class having Main method (StartupClass in the above example).
Click on browse and select the directory where jar file should be saved and enter a name for Jar file and click on finish button.
Step 7: This Jar can be used as independent application. Double click on the created Jar to use the application.


